Deployment
This guide uses Zoom as our service, your service may be different, be sure to name it something appropriately. The environment used in our examples is set to dev as the default.
Getting Started
- Clone the master branch of the repository at “https://github.com/mozilla/mozdef-event-framework” to the local file system.
- Before any action, decide on the various parameter and environment variable values, as these are referenced throughout the CF templates and serverless framework configuration. The following are the environment variables with example values:
- PROJECT: MozDef-EF
- SERVICE: zoom
- STAGE: dev
- API_PATH: events
- Stack name: zoom2mozdef
Note
The rest of these steps are not needed if you will not use Github in your workflow.
If you would like to use Github as a repository (either as the single repo to host everything, or in the multi-source scenario), create:
- A Github repository,
- A Personal Access Token (Your account settings -> Developer Settings -> Personal access token)
It is sufficient for the generated token to have the following scopes:

Decide on how you would like store your GitHub token using AWS Secrets Manager. You will have to specify this as a stack parameter during deployment. You should determine the name of the secret so CloudFormation can refer to it. We recommend this to be specific for your stack, for instance:
“<project>/<service>/<environment>/codepipeline/github”
Steps in the AWS Console
You’ll need to log into the AWS console or you can alternatively use the aws-cli to create the parameters needed for your webhook to properly authenticate:
Login to AWS Console using your account credentials. This framework has been tested to work with federated logins where the user assumes a role.
Navigate to “Services” and under “Management and Governance” select “Systems Manager”
Once the page loads, under “Application Management, choose “Parameter Store”
Create a parameter there in the form of:
“/<project>/<service>/<environment>/auth_token”
Example: For our Zoom example, this would be something like:
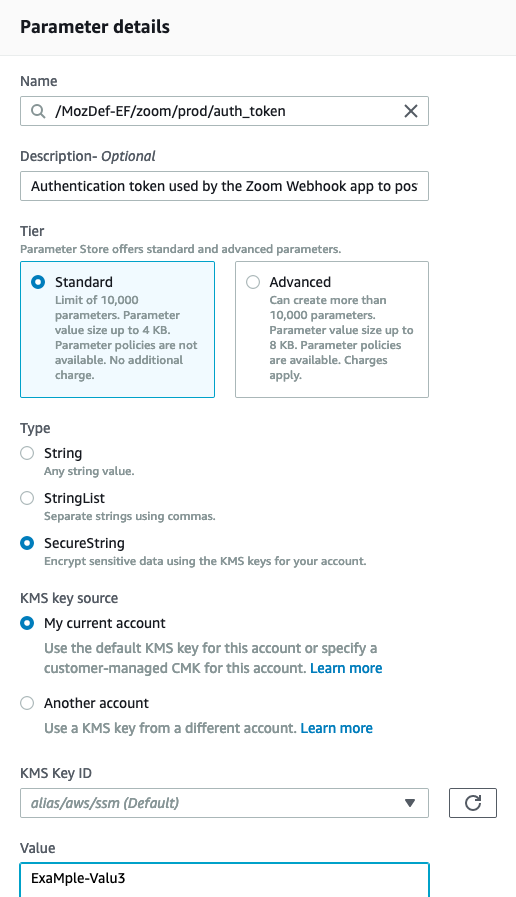
- In the description field, add “Authentication token used by the Webhook app to post events”.
- For type, select “SecureString”.
- For value, paste the value from the app’s configuration from your webhook’s configured authentication token.
- Add a Tag with key: Project and value: <project>-<environment>, then create the parameter.
Note
The rest of these steps are not needed if you will not use Github in your workflow.
- If you are using Github as a repository, you need to store the personal access token value in AWS Secrets Manager. Navigate to “Services” and select “Secrets Manager”.
- Store a new secret of type “Other type of secrets”.
- Specify the key/value pair as “PersonalAccessToken” (without quotes) and the value of the token and click next.
- For the secret name, enter the name you determined in step 4 of Getting Started.
- Add a description and a tag using these “Project” as key and <project>-<environment> as the value. Click next.
- Configure if you would like to automatic rotation of this secret. Click Next.
- Review the details and click store when ready.
Note
The next step is only required if you would like to use the multi-source deployment option.
- If you would like to keep the source code for the framework and its configuration separately, you will need to use a merger function (as lambda). We have provided this code as a ZIP archive in the folder “templates/multi_source_template/merge_function”. For this to be used as a part of the pipeline, you need to create an S3 bucket and upload this ZIP file to that bucket.
Once created, take a note of the name of the S3 bucket, as you will have to provide this as a stack parameter during deployment. We used a default name of “mozdef-ef-helper-bucket”.
Fill in the Framework Config Template
The following should be done in your local copy of the framework you cloned or forked:
- Open the downloaded repository in an IDE to edit locally.
- Under config directory, edit “buildspec-dev.yml” file to contain:
version: 0.2

env:
  variables:
    STAGE: dev
    SERVICE: zoom
    PROJECT: MozDef-EF
    API_PATH: zoom
    TOKEN_ARN: arn:aws:ssm:$AWS_REGION:<ACCOUNT_ID>:parameter/<parameter-name>

phases:
  install:
    runtime-versions:
      python: 3.7
      nodejs: 10
    commands:
      # Install dependencies here
      - pip3 install --upgrade awscli -q
      - pip3 install --upgrade pytest -q
      - pip3 install --upgrade moto -q
      - pip3 install --upgrade aws-xray-sdk -q
      - npm install -g --silent --progress=false serverless
      - npm install --silent --save-dev serverless-pseudo-parameters
      - npm install --silent --save-dev serverless-prune-plugin
      # Remove or comment out the next line if you are not using
      # "serverless-python-requirements" plugin to manage 3rd party Python libraries
      - npm install --silent --save-dev serverless-python-requirements
  pre_build:
    commands:
      # Perform pre-build actions here
      - chmod +x $CODEBUILD_SRC_DIR/config/deploy.sh
      - $CODEBUILD_SRC_DIR/config/deploy.sh unit-test
  build:
    commands:
      # Invoke the deploy script here
      - $CODEBUILD_SRC_DIR/config/deploy.sh deploy $STAGE $AWS_REGION
- The important part here is the filling in of the “env” section at the top of the file. These environment variables will be used by the “serverless.yml” file when deployed by the serverless framework. For each service deployed for a source (such as zoom), the service name and API path will be different.
- Save the file.
- Make any other desired changes on the local copy. For webhook based services, like zoom, there should not be any additional changes needed.
Deploy Your Framework
This is where we take everything we’ve done up to this point and start the deployment.
- Go back to AWS Console “Services -> CodeCommit” and create a repository with the name “<project>-<service>”, in this case “mozdef-ef-zoom”. Add a description and a tag with key: Project and value: <project>-<environment>.
- Using the connection settings, setup Git access with the git credential helper over HTTPS (ensure you can pull and push to the newly created repo)
- Pull the empty repository to a local directory, then add/move all the cloned and updated framework code to this repository. Add and commit all changes, then push.
Note
Make sure to not override the
.gitdirectory while moving the framework code from Github to your newly created custom CodeCommit repository.Note
Currently, the Serverless app uses serverless-python-requirements plugin to manage 3rd party libraries. Do not forget to update the
requirements.txtwith your dependent libraries/modules.Also, if you would like to manage the requirements in another way (without this plugin), do not forget to update the
serverless.ymlfile accordingly.
- Go to “Services -> CloudFormation” on the AWS Console.
- On top right, click “Create stack (with new resources)”
- Select “template is ready” on the first option. In “specify template” menu, select “upload a template file”
Create stack from Template:Example screenshot for creating a stack from the template
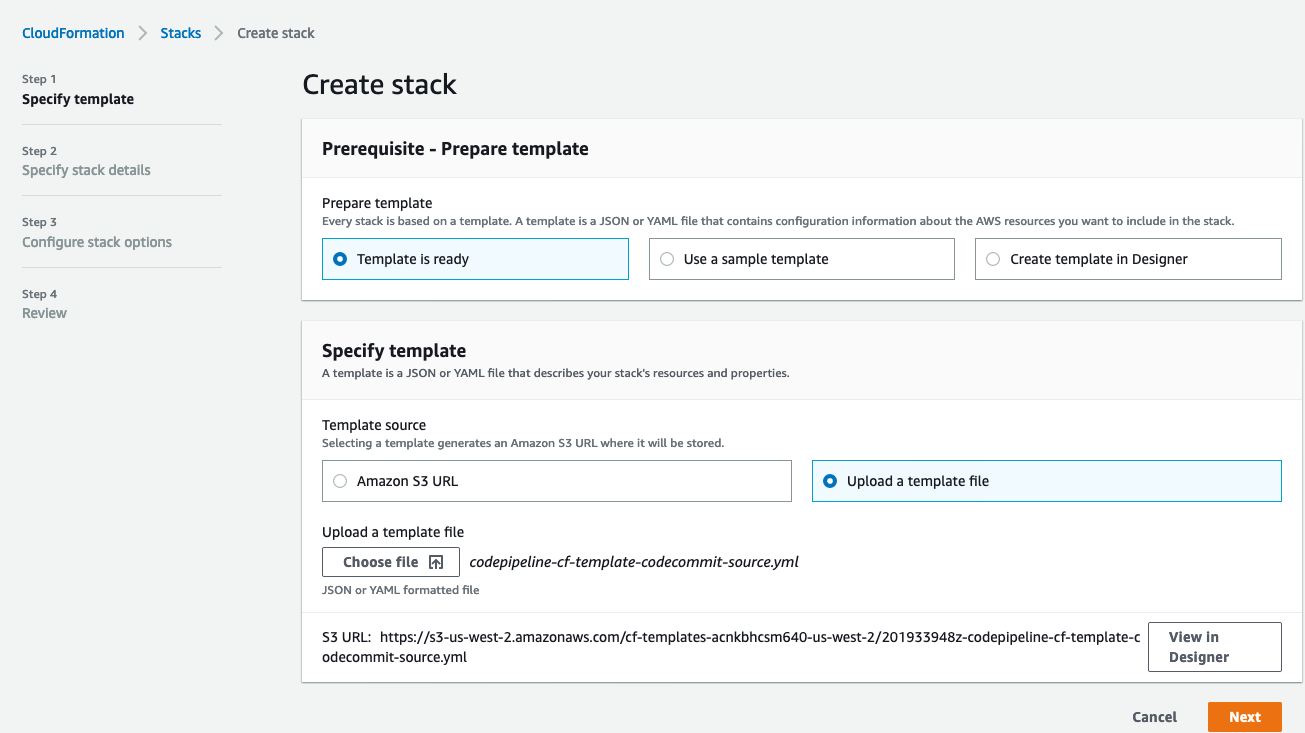
- Browse the filesystem, and select the “codepipeline-cf-template-codecommit-source.yml” CloudFormation template under the “templates” directory of the cloned and updated framework code. Assuming no syntax errors, click next.
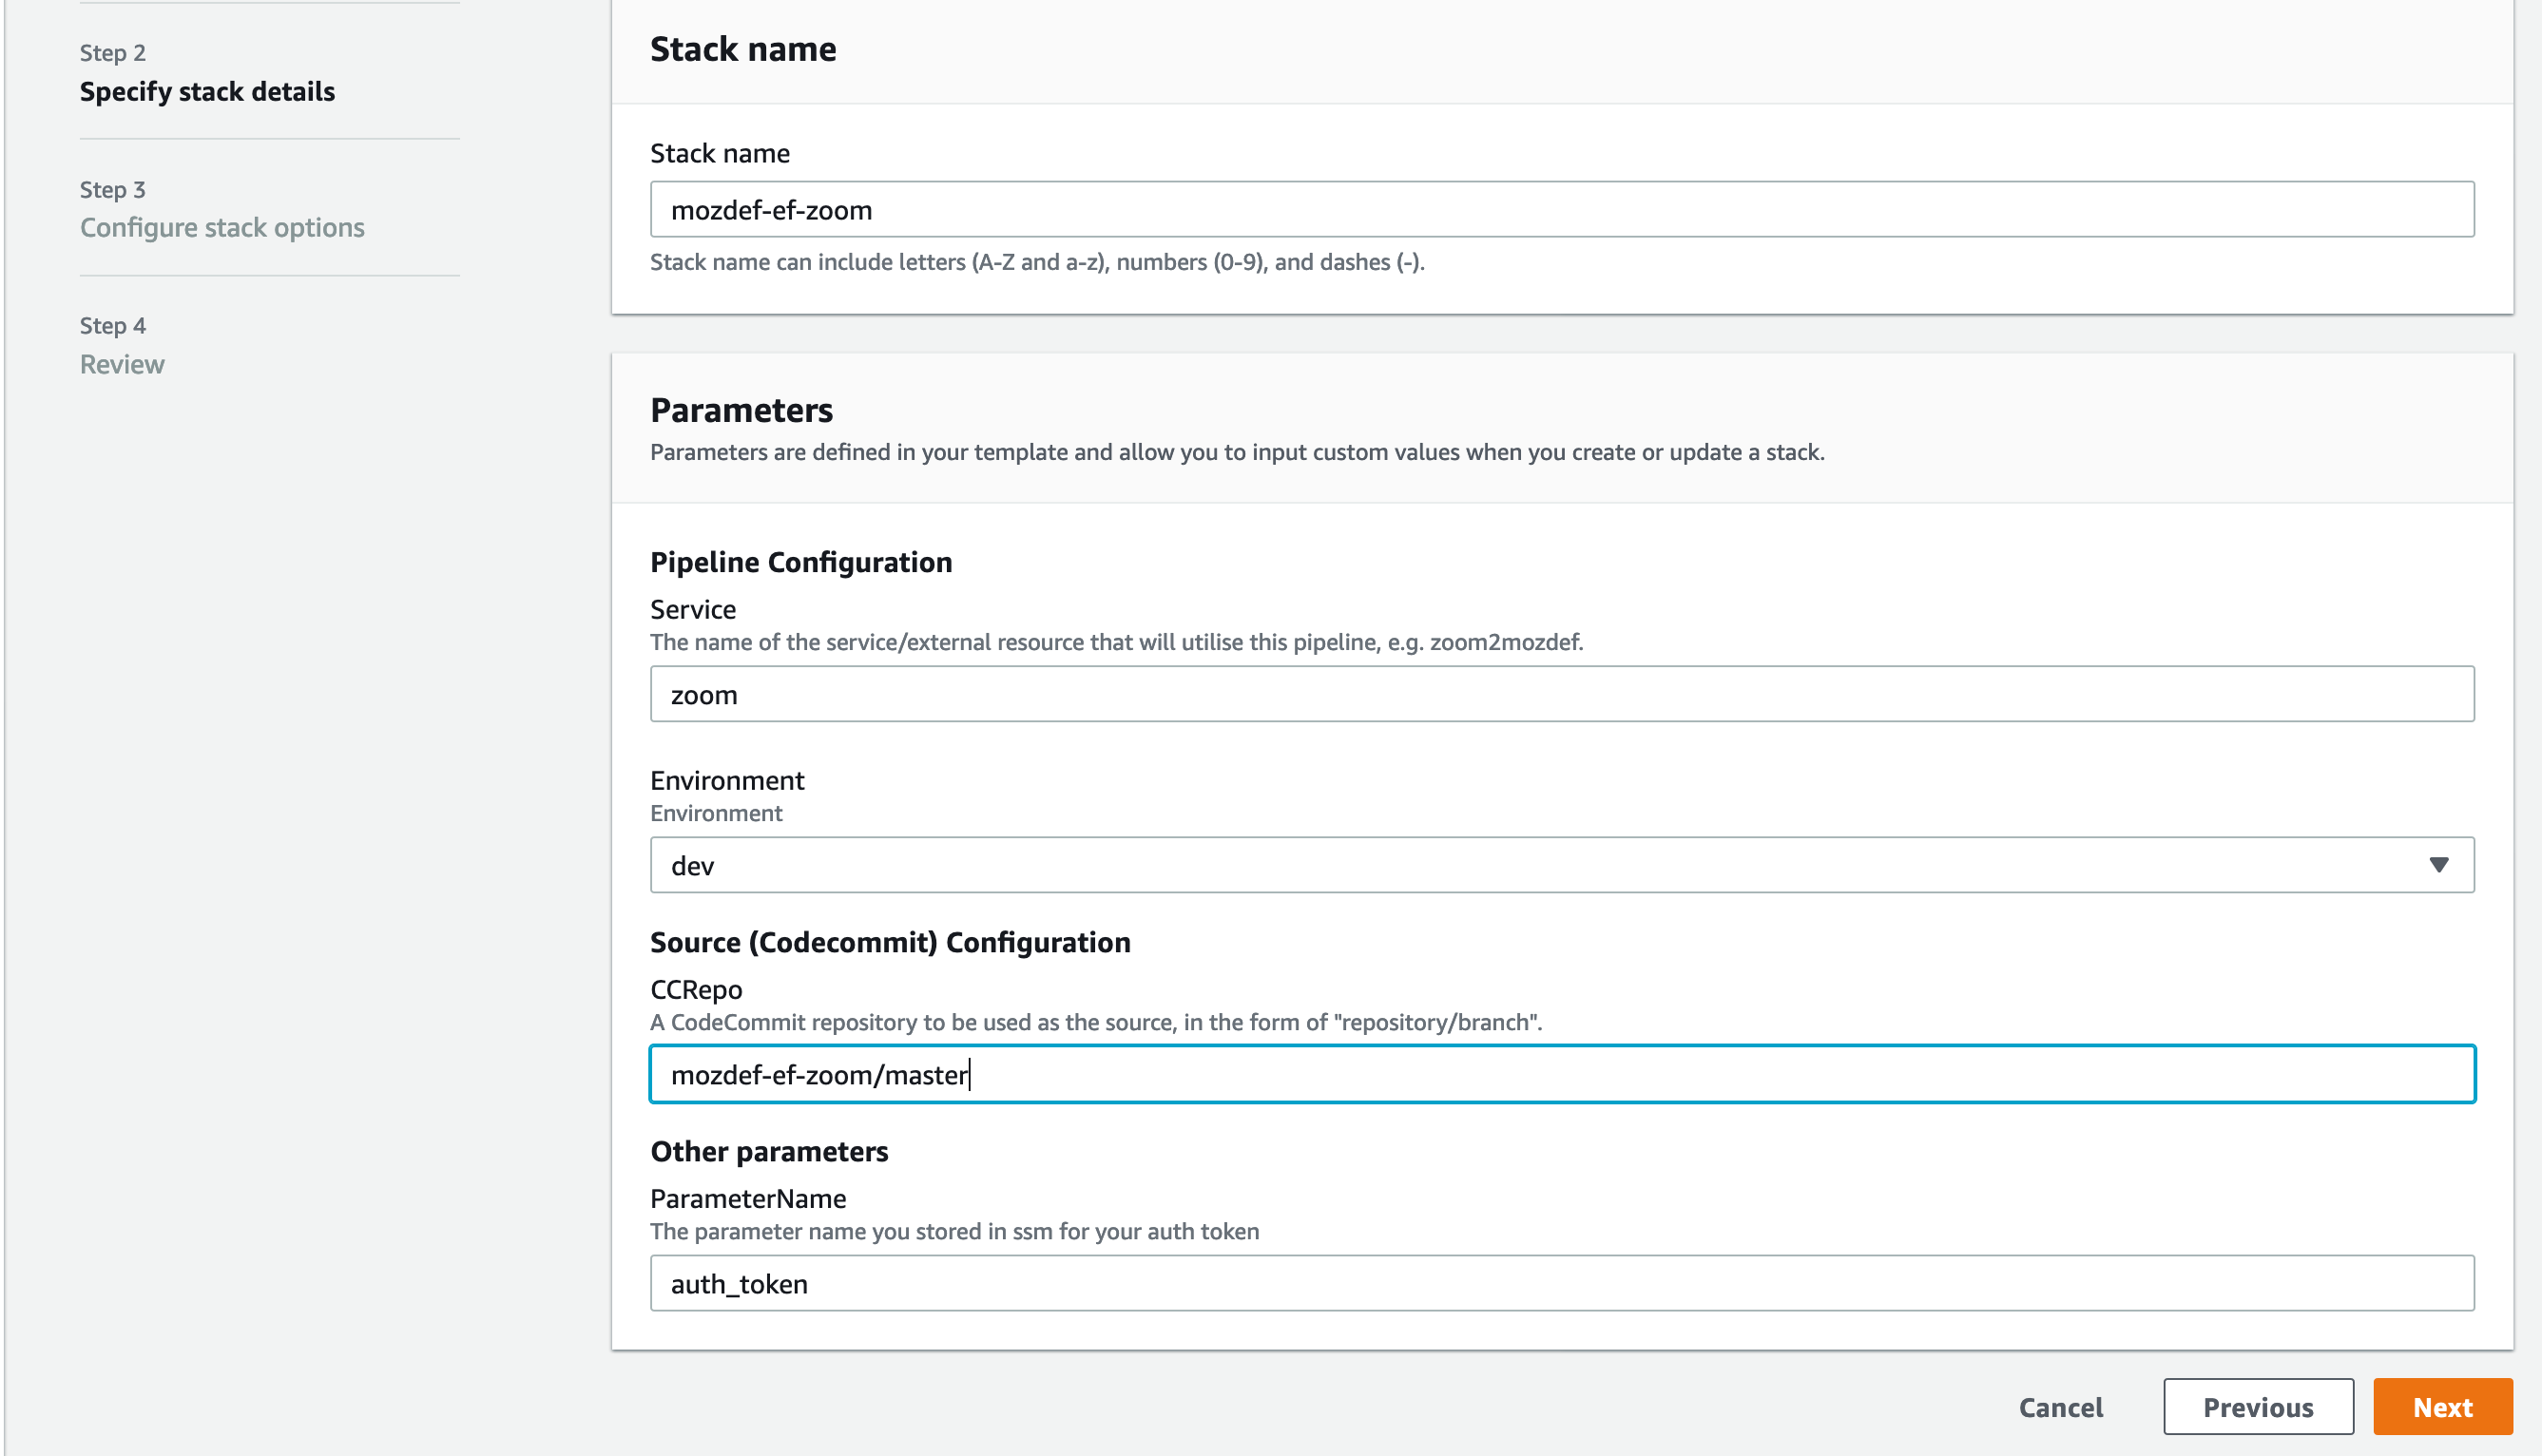
- For the stack name, enter something descriptive, like: <project>-<service> (e.g., mozdef-ef-zoom, see the example image below for steps 8 through 12).
- For stack parameters, enter the values decided in Getting Started Step 2.
- For service, enter your <service> name that you determined earlier.
- For environment, choose “dev”, “staging”, or “prod” according to the environment you are working out of.
- In the SSMParamName field you’ll need to enter the name of the SSM parameter used to store the auth token to correctly map the IAM permissions for this resource.
- An S3 utility bucket will be created for AWS CodePipeline to store artifacts. The bucket name will match the parameters you created for your stack name in step 8 and the environment in step 11 (e.g., <stackname>-<environment>-utility)
- For source configuration, enter the name of the codecommit repo created in step 1, and the branch to monitor for changes and trigger rebuilds of the deployment. For our example we used zoom, “mozdef-ef-zoom/master”.
Stack Details:Example screenshot for steps 8 through 12
- Under stack options, add a tag with key: “Project” and value: <project>-<environment>. Click Next
- On the review step, check the box under “Capabilities” saying “I acknowledge that AWS CloudFormation might create IAM resources with custom names.”.
- Click Create Stack. On the Cloudformation page, check the stack creation status. It should deploy the pipeline stack successfully.
- Once the API Gateway has been created, copy the URL into your webhook application’s configuration as the endpoint to post events to begin sending events to the AWS infra that was deployed using this framework.
Note
There is a stack output called
ServiceEndpointwhich is generated by the Serverless Framework after deployment. If you specified a customAPI_PATHin your buildspec in Getting Started, this will not be your endpoint URL. Instead, your correct endpoint URL would be the value of<ServiceEndpoint>/<API_PATH>
- Pull the empty Github repository created earlier in section Getting Started to a local directory, then add/move all the cloned and updated framework code to this repository. Add and commit all changes, then push.
- Do not forget to modify the
deploy.shconfiguration file to remove the reference to$CODEBUILD_SRC_DIRenvironment variable (as it is specific to CodeCommit build image).Note
Make sure to not override the
.gitdirectory while moving the framework code from Github to your newly created custom GitHub repository.Note
Currently, the Serverless app uses serverless-python-requirements plugin to manage 3rd party libraries. Do not forget to update the
requirements.txtwith your dependent libraries/modules.Also, if you would like to manage the requirements in another way (without this plugin), do not forget to update the
serverless.ymlfile accordingly.
- Go to “Services -> CloudFormation” on the AWS Console.
- On top right, click “Create stack (with new resources)”
- Select “template is ready” on the first option. In “specify template” menu, select “upload a template file.
- Browse the filesystem, and select the “codepipeline-cf-template-github-source.yml” CloudFormation template under the “templates” directory of the cloned and updated framework code. Assuming no syntax errors, click next.
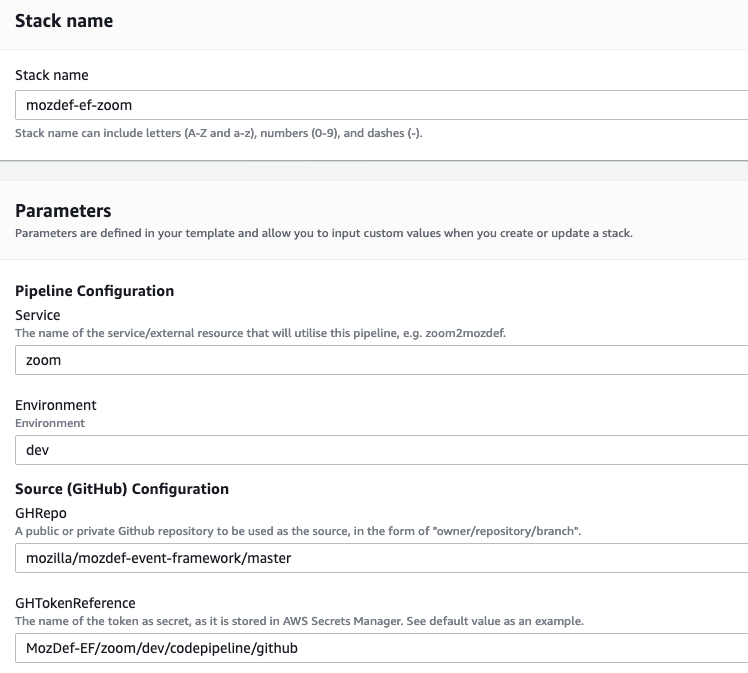
- For the stack name, enter something descriptive, like: <project>-<service> (e.g., mozdef-ef-zoom, see the example image below for steps 6 through 10).
- For stack parameters, enter the values decided in Getting Started Step 2.
- For service, enter your <service> name that you determined earlier.
- For environment, choose “dev”, “staging”, or “prod” according to the environment you are working out of.
- In the SSMParamName field you’ll need to enter the name of the SSM parameter used to store the auth token to correctly map the IAM permissions for this resource.
- An S3 utility bucket will be created for AWS CodePipeline to store artifacts. The bucket name will match the parameters you created for your stack name in step 8 and the environment in step 11 (e.g., <stackname>-<environment>-utility)
- For source configuration:
- Enter the name of the Github repo housing the code, in the following format: owner/repository/branch.
- For the token reference, enter the name you determined in step 4 of Getting Started. This way the template will be able to find the secret (Github token) stored in AWS Secrets Manager.
Stack Details:Example screenshot for creating a stack from the template with GitHub
- Under stack options, add a tag with key: “Project” and value: <project>-<environment>. Click Next.
- On the review step, check the box under “Capabilities” saying “I acknowledge that AWS CloudFormation might create IAM resources with custom names.”.
- Click Create Stack. On the Cloudformation page, check the stack creation status. It should deploy the pipeline stack successfully.
- Once the API Gateway has been created, copy the URL into your webhook application’s configuration as the endpoint to post events to begin sending events to the AWS infra that was deployed using this framework.
Note
There is a stack output called
ServiceEndpointwhich is generated by the Serverless Framework after deployment. If you specified a customAPI_PATHin your buildspec in Getting Started, this will not be your endpoint URL. Instead, your correct endpoint URL would be the value of<ServiceEndpoint>/<API_PATH>
- Go back to AWS Console “Services -> CodeCommit” and create a repository with the name “<project>-<service>”, in this case “mozdef-ef-zoom”. Add a description and a tag with key: Project and value: <project>-<environment>.
- Using the connection settings, setup Git access with the git credential helper over HTTPS (ensure you can pull and push to the newly created repo).
- Pull the empty repository to a local directory, then only add the config directory contents from the cloned framework code to this repository. Make relevant configuration changes (such as to the deploy script, buildspec etc.), commit all changes, then push.
- Now, also pull the empty Github repository created earlier in section Getting Started to another local directory. Add/move all the cloned framework code to this repository, except “config” directory. Make changes to the code if desired, commit all changes, then push.
Note
You could also move everything to this repository (including the config directory), but add “config/” to the .gitignore file in order to avoid having multiple config directories tracked by source control.
Also make sure to not override the
.gitdirectory while moving the framework code from Github to your newly created custom repositories.Note
Currently, the Serverless app uses serverless-python-requirements plugin to manage 3rd party libraries. Do not forget to update the
requirements.txtwith your dependent libraries/modules.Also, if you would like to manage the requirements in another way (without this plugin), do not forget to update the
serverless.ymlfile accordingly.
- Go to “Services -> CloudFormation” on the AWS Console.
- On top right, click “Create stack (with new resources)”
- Select “template is ready” on the first option. In “specify template” menu, select “upload a template file”.
- Browse the filesystem, and select the “codepipeline-cf-template-with-merge.yml” CloudFormation template under the “templates” directory of the cloned framework code. Assuming no syntax errors, click next.
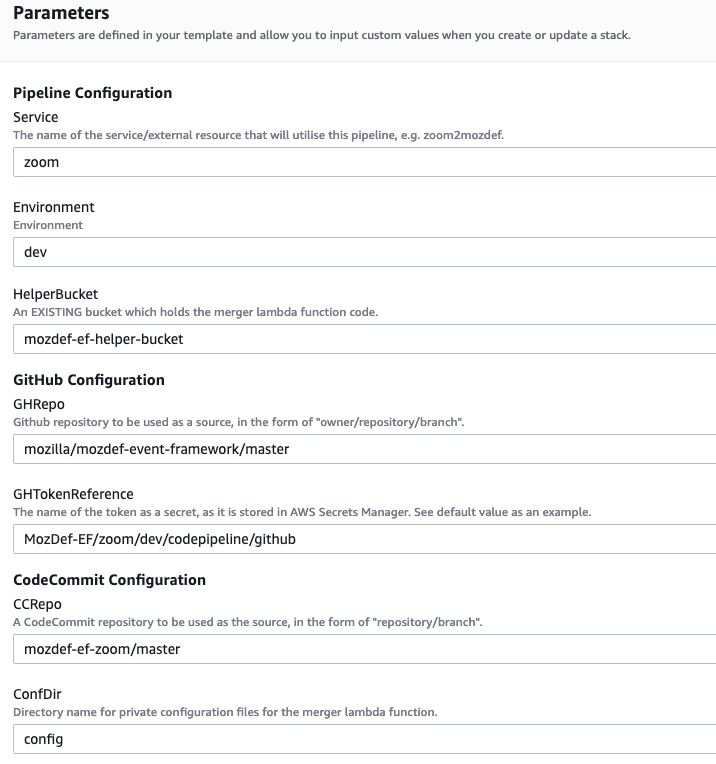
- For the stack name, enter something descriptive, like: <project>-<service> (e.g., mozdef-ef-zoom, see the example image below for steps 9 through 14).
- For stack parameters, enter the values decided in Getting Started Step 2.
- For service, enter your <service> name that you determined earlier.
- For environment, choose “dev”, “staging”, or “prod” according to the environment you are working out of.
- For helper bucket, enter the name of the S3 bucket created previously (created in the last step of Steps in the AWS Console section) that houses the merge lambda code.
- In the SSMParamName field you’ll need to enter the name of the SSM parameter used to store the auth token to correctly map the IAM permissions for this resource.
- An S3 utility bucket will be created for AWS CodePipeline to store artifacts. The bucket name will match the parameters you created for your stack name in step 8 and the environment in step 11 (e.g., <stackname>-<environment>-utility)
- For GitHub configuration:
- Enter the name of the Github repo housing the code, in the following format: owner/repository/branch.
- For the token reference, enter the name you determined in step 4 of Getting Started. This way the template will be able to find the secret (Github token) stored in AWS Secrets Manager.
- For CodeCommit configuration:
- Enter the name of the codecommit repo created in step 1, and the branch to monitor for changes and trigger rebuilds of the deployment. For our example we used zoom, “mozdef-ef-zoom/master”.
- Enter the name of the directory that has configuration data for the pipeline (default: config).
Stack Details:Example screenshot for creating a stack using multi-source template
- Under stack options, add a tag with key: “Project” and value: <project>-<environment>. Click Next.
- On the review step, check the box under “Capabilities” saying “I acknowledge that AWS CloudFormation might create IAM resources with custom names.”.
- Click Create Stack. On the Cloudformation page, check the stack creation status. It should deploy the pipeline stack successfully.
- Once the API Gateway has been created, copy the URL into your webhook application’s configuration as the endpoint to post events to begin sending events to the AWS infra that was deployed using this framework.
Note
There is a stack output called
ServiceEndpointwhich is generated by the Serverless Framework after deployment. If you specified a customAPI_PATHin your buildspec in Getting Started, this will not be your endpoint URL. Instead, your correct endpoint URL would be the value of<ServiceEndpoint>/<API_PATH>